Sunday, June 14, 2009

ImageShack QuickShot – grab screenshots and upload them automatically

I’ve been using ImageShack’s image hosting service for years. It’s really one of the easiest to use and it’s also free.

If you set up a free account, all the images you upload will be kept there for you and they are fairly easy to search and categorize using tags.

A common use of their hosting service might be to upload your  photos to share with your friends and family. Instead of attaching a large group of photos to an email, it’s better to upload them and include links to them. You can even link to a slideshow that nicely displays your photos.

I most commonly use their service here in my websites because it’s easier to upload to ImageShack than it is to my own sites. Many of the pictures you see at Freewarewiki are hosted by ImageShack.

ImageShack also provides a good selection of tools that make uploading photos and images from your desktop or browser much easier.

I recently tried out the QuickShot tool that ImageShack offers. It allows you to take screenshots of your display or open applications, then automatically uploads them and sends an image link to your Windows clipboard for easy pasting.

http://img199.imageshack.us/img199/725/06142009132742.png

Quote from the website:
ImageShack QuickShot v1.52
ImageShack QuickShot integrates with Windows XP, 2000, or 2003 and allows you to take a screenshot and upload it to ImageShack with the press of a key!

QuickShot is great for documenting application features and making up tutorials that need to be published online.

If you decide to try out ImageShack, be sure to check out the other nice tools they provide there. Here’s a list of them as displayed on their tools page:

Have fun with your images and be sure to comment below with your questions or solutions for displaying images online.
Saturday, June 13, 2009

TestDisk - free utility to recover accidental reformats

About two years ago, a friend of mine accidentally reformatted a hard drive. He had over 5 gigs of music files from dozens of CDs that he'd collected over the years. He was sad, and I had no advice to give him.

If I could travel back in time, I could at least have offered some hope for him. It's possible to recover entire file systems that have been reformatted. I recently read about a recovery utility called TestDisk on the Windows Secrets Newsletter (paid version). Fred Langa, formerly the author of the LangaList passed on a tip from one of his readers that told how he saved over $400 in repair costs by using TestDisk.

I found out that I've had a copy of TestDisk for a long time and never knew it. It's included as a tool on several Live CDs including one or my favorites called GParted. A fellow named Herman has written a great How-To page on using TestDisk.
Herman's TestDisk HowTo

I haven't used this program yet and I hope I never have to. I wrote about TestDisk in the hope that it may stick in your mind if you ever have to recover a reformatted hard drive.

Quote from the authors:

TestDisk is a powerful free data recovery software! It was primarily designed to help recover lost partitions and/or make non-booting disks bootable again when these symptoms are caused by faulty software, certain types of viruses or human error (such as accidentally deleting a Partition Table). Partition table recovery using TestDisk is really easy.

Website: http://www.cgsecurity.org/wiki/TestDisk

Thursday, June 11, 2009

OpenTarget – adding a new option for XP shortcuts

If you love to organize files and menus on your computer, you can’t avoid using shortcuts. And if you have lots of shortcuts, you sometimes need to find out what a shortcut is actually pointing to (it’s target). You simply can’t remember them all.

Shortcut Keys

I’d gotten pretty darn quick at finding targets for shortcuts by clicking on a shortcut and hitting the Context Menu key then the R key. That’s the same as right clicking on the shortcut and choosing “Properties”, but it’s actually faster because the right click seems to have a delay built in.

image+ R


Once you have a shortcut’s properties displayed, you can pick the “Find Target” button to find out what the shortcut is pointing to.

findTargetButton

= ALT + F

And if you really want to get fancy, after you’ve hit the Context then R key you can also hold down the Alt key and press F to open up the Find Target button.

Now that you know how I open up the Find Target quickly, I can tell you that there’s an even better way, maybe even two ways.

OpenTarget vs Windows Powertoys

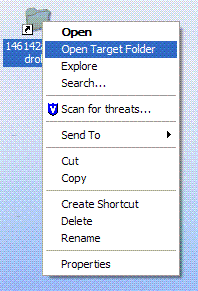
There’s a cute little program out there called OpenTarget, which adds an item to the right click menu for shortcuts.

Quote from the author:openTarget

… probably the most pointless shell extension in history: OpenTarget. The major idea is to extend the default context menu of shortcuts to include (you guessed it) "Open Target Folder".

The shortcut target is now selected when Explorer is launched
Made verb configurable, so you can either Open or Explore

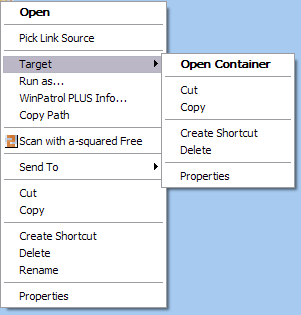
After finding OpenTarget, I ran into another utility that does the same thing and it’s been around since Windows 95. The Windows 95 Powertoys collection has a DLL and INF file that allow you to install a “Target” section in the shortcut right click menu. When you install it, you can right click on a shortcut, expand the Target menu and choose “Open Container” to go where that target is stored.

openContainer

At first, I thought that the Cut, Copy and other items in the sub menu were just a repeat of the ones further down in the main menu. Then I realized that they only act on the target of the shortcut. Now that could be handy.

Installing this Powertoy is a bit tricky, but I’ll break it down for you.

  • Download the Win95 Powertoys
  • Create a folder and move the file W95powertoy.exe into it
  • Double click the W95powertoy.exe file to start the extraction of the 31 Powertoys into the folder.
  • Then right click on the TARGET.INF file and choose the Install option.

That’s all I’ve got for you on this topic. Be sure to comment if you have your own solutions and tips.

Tuesday, June 09, 2009

Cool site – LiverFoundation.org

Here’s a message from Tiffany that I felt I should share with you …

A very dear friend's life was saved by a liver transplant, so today's Cool Site of the Day has special meaning for me:

http://freewarewiki.com/f/liverFoundationLogo.jpg http://www.liverfoundation.org/

I hope this invaluable information may help someone else.  It's really an interesting article, with great tips and sound advice on how to keep YOUR liver healthy! http://www.liverfoundation.org/education/info/transplant/

Please share it with everyone you care about.

Tiffany Cartier

Best wishes for your friend’s continuing health.

Monday, June 08, 2009

Hardlink Shell Extension - help with symbolic links in Windows

Have you ever needed to have multiple synchronized copies of the same folder or files on your PC? I'll admit, it's rare that I need this and most often it's easier to simply create shortcuts to files and folders. It's also easy to copy a folder or files and place it somewhere else, but how can you keep the all the copies updated if a file changes?

There are plenty of free sync tools out there that allow you to synchronize files and folders on a hard drive, but there is an easier way. I'm guessing that most of you have never heard of symbolic links (Unix/Linux) or hard links (Windows NT, 2000, XP, Vista).

Ever since Windows NT came out, you can create hard links to files and folders. These hard links make it look like you have multiple copies of files or folders when in fact they are only stored in one location. This saves file space and it means that you don't have to run file synchronizer software to keep all the copies updated. The only problem is that you can normally only create these links using command line tools. I don't like using the command window unless it's absolutely necessary.

I found a Windows shell extension called Hard Link Shell Extension that lets you right click on files and folders to create hard links. You can read more about it below.

Tip 1: Please note that this only works on a single hard drive. If you need to sync files between hard drives, see these free folder sync utilities. If you need to sync files between computers, I recommend DropBox, Windows Live Sync or similar services.

Tip 2: If you are using DropBox to synchronize files between computers over the internet, you may find that Hard Link Shell Extension is very handy. See LifeHacker's article: Sync Files and Folders Outside Your My Dropbox Folder

Quote from the website

Have you ever wanted to create hardlinks as it was possible with Unix, but not from the commandline but from the Explorer simply by right clicking an item? Take a look a the HardlinkShellExtension for WinNT/2K

Hardlinks provide the ability to keep a single copy of a file yet have it appear in multiple folders (directories).  They can be created with the POSIX command ln included in the Windows Resource Kit or the fsutil command utility included in Windows XP.  Thus, using standard Windows facilities Hardlinks can only be created at the command prompt, which can be tedious, especially when Hardlinks to multiple files are required or when one only makes occasional use of Hardlinks.

Website: http://schinagl.priv.at/nt/hardlinkshellext/hardlinkshellext.html

Thursday, June 04, 2009

Magnifixer – great screen magnifier

A screen magnifier us one of those tools that many of you don’t use often or not at all. Windows provides it’s own built in magnifier program, but it’s pretty lame in comparison to many of the freebies out on the web.

I probably use a magnifier more now that my eyes are getting old, and when I do, I like to have plenty of options.

Magnifixer is my current favorite because it’s easy to tweak with nearly a dozen different settings as shown below. It’s one of the best free magnifiers I’ve found.

Tip: You can turn it into a portable version by simply copying the program folder onto a flash drive.

Screen Magnifier

image

From the authors:

Magnifixer is a screen magnifier utility. You can place it anywhere on your screen, make it any size you want and select a zoom level. Magnifixer will always show the area of your screen where the mouse cursor resides.

- Up to 40x Magnification
- Place anywhere on your screen
- Dual monitor supported
- Smoothing for better readability
- Cursor tracking or fixed location view
- Stay-on-top window option
- Color Display (HTML or RGB mode)
- Most settings are saved and reused
- Very simple and intuitive interface
- Uninstall option

Website: http://www.blacksunsoftware.com/screenmagnifier.html